
Thanks for trying out CSMidiModulator!
Important Note: This is a 64-bit component, so only install it if you’re using a 64-bit DAW.
Important Note #2: This plugin has received limited testing, so don’t immediately throw it on an important project… play around a bit until you’re sure it’s stable on your system.
I’m not responsible if it crashes your DAW while you’re composing your Grammy Award winning project… or if your computer bursts into flames, your dog learns to play guitar, etc.
INSTALLATION
To install, right-click on ‘Install.bat’ and click ‘Run as administrator’. This will register the MidiFX component.
If you’d like to remove it, right-click on ‘Uninstall.bat’ and click ‘Run as administrator’.
The MidiFX component DOES NOT have to be placed in a particular directory. You can put it anywhere on your drive. Just don’t move it after it’s registered.
If you need to move it, run ‘Uninstall.bat’, copy the entire CSMidiModulator directory to the new location, and run Install.bat.
USE
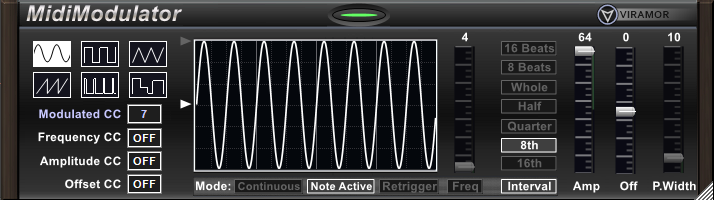
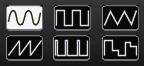
Select the type of waveform to generate in the top left section. You can select from Sine, Square, Triangle, Sawtooth, Pulse (variable width), or Random.
The bottom left section allows you to set the Control Change parameters.

Modulated CC: This is the CC data that will be generated. In the picture it’s set to 7, so it will output Volume CC data.
The next three settings allow you to set a CC that will control some of the parameters of the generator. You can double-click on the parameter edit box and type a number directly or use the mouse wheel to cycle through the numbers. If you aren’t using a parameter, double-click and enter ‘0‘. and the box will display ‘OFF‘.
Right-clicking on the edit box will bring up a small menu. Select ‘Learn‘ and move a knob or slider on your keyboard or control surface to set the value automatically. Select ‘Cancel‘ in the menu if you decide not to learn the parameter.
Frequency CC: This specifies the CC control that can be used to control the Frequency setting.
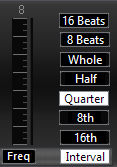
If you’ve selected ‘Freq‘, or Smooth mode (see below), CC’s 1-127 will seamlessly change the frequency of the generated wave. If you’ve selected ‘Interval‘ mode, the values (16th, 8th, Quarter, etc.) will be selected via ranges.
CC 1-2 will select 16th
CC 3-5 will select 8th
CC 6-11 will select Quarter
CC 12-23 will select Half
CC 24-47 will select Whole
CC 48-95 will select 8 Beats
CC 96-127 will select 16 Beats
Hover over each of the Interval selection buttons to see the range for that Interval.
Amplitude CC: This sets the parameter used to control the ‘Amp‘ slider.
Offset CC: This sets the parameter used to control the ‘Off‘ slider.
There are two pointed rectangles to the left of the waveform display.
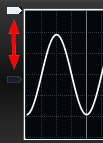
Clicking the top rectangle will make the waveform start at the edge (top or bottom) each time it’s triggered and clicking the bottom rectangle will make the waveform start in the middle.
There are three buttons under the waveform display that determine how, or when the waveform is created.

Continuous: This mode will create a constant stream of CC data to be produced whether a note is playing or not. One of the only reasons to use this mode is if you have a synth that continues to play sound after the note is released and you want CC data to be generated during the tail.
Note Active: This mode will produce CC data only when one or more notes are playing. This is the mode you’ll usually use.
Retrigger: If this button is on, the waveform will restart every time a new note is pressed. For example, playing a three note chord where each note is separated by some amount of time will retrigger the waveform each time an additional note is pressed. If Retrigger is off, the waveform will start with the first note but will continue its pattern as each additional note is pressed.
Setting the waveform frequency works in one of two ways.
Freq: When this mode is selected, the slider above it (or the CC parameter, if you are using it) will set the frequency of the waveform. This will produce a smooth transition when the frequency is changed.
Interval: In this mode, the buttons above the button determine the frequency of the waveform. It will lock to the musical time selected. This causes an abrupt change in the waveform frequency, so you won’t usually want to change it while a note is playing.
The sliders on the right side of the interface allow you to manually set the Amplitude, Offset, and Pulse Width of the waveform.
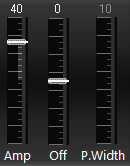
Amp: This control ranges from +64 to -64. If it’s set to ‘0’ (center), you’ll get a flat waveform. Positive and negative values increase the size of the waveform, but invert it depending on the direction. In other words, a value of +64 will be the same amplitude as a value of -64, but opposite phase. Try it out and it’ll make sense 🙂
Off: This slider adjusts the overall center position of the waveform.
P.Width: This adjusts the width of the pulse. It’s only enabled if the Pulse waveform is selected.
The ‘Power‘ button on the top acts as a bypass switch.

The MFX works on real-time input from a keyboard, also. If you’re using the Frequency, Amplitude, or Offset CC modulators, they will be passed through and recorded to the track.
An important thing to remember when using the plugin during track playback is that manual changes during playback to the settings will not be heard immediately. This is because the MIDI data is streamed to the component about two measures ahead of the time it’s actually played. Changes made when playing live on the keyboard will be heard immediately.
Have Fun!
If you find any bugs (User Error!) or you have suggestions or requests for enhancements, you can discuss the plugin on this forum or on the Cakewalk forum.